Set Your YouTube Defaults Once: Theater Mode and Best Quality
There's a small ritual most YouTube viewers know by muscle memory: video starts, click the theater button, open the settings gear, tap Quality, pick the top resolution. It takes five seconds. Then the next video starts, and somehow you're doing it again. None of it is hard — it's just a tax you pay over and over for preferences that never change.
Mira's approach is to make those decisions once, in Settings, and then apply them for you on every video. Watching becomes the only step: open a video, and it's already wide, already at the highest available resolution, already the way you like it.
Always the wide layout
Always use Theater Mode opens videos in YouTube's wide theater layout automatically. If you've decided the bigger player is how you want to watch — and most people who try theater mode don't go back to the small one on purpose — that decision now just holds.
Always the highest quality
Always use Best Quality has Mira automatically select the highest available resolution for every video, up to 4K. No trips to the settings gear, no noticing ten minutes in that you've been watching soft, low-resolution footage of someone's carefully color-graded film.
This matters more than it used to. Creators increasingly shoot and master in 4K, and an automatic quality pick doesn't always reach for it. If you have the screen and the connection for it, there's no reason every video shouldn't simply arrive at its full resolution.
Set both in one place
- Open Settings — the gear icon in the toolbar on Mac (or press ⌘,), or via the tool menu on iPhone and iPad.
- Go to General → YouTube.
- Turn on Always use Theater Mode.
- Turn on Always use Best Quality.
Both options are also offered during Mira's first-launch setup — they appear as Always use Best Quality and Always use Theater Mode in the four-step intro, with recommended options pre-selected. If you enabled them there, you're already done, and everything in this post is just a map of where to change your mind later.
Keep long sessions playing
The same spirit applies to YouTube's "Are you still watching?" prompt, which has a knack for appearing during the lecture you stepped away from or the playlist running while you cook. Turn on Auto-dismiss 'Are You Still Watching?' in Settings → General → YouTube and Mira dismisses it for you, so long playlists, lectures, podcasts, and live streams keep going.
While you're in there
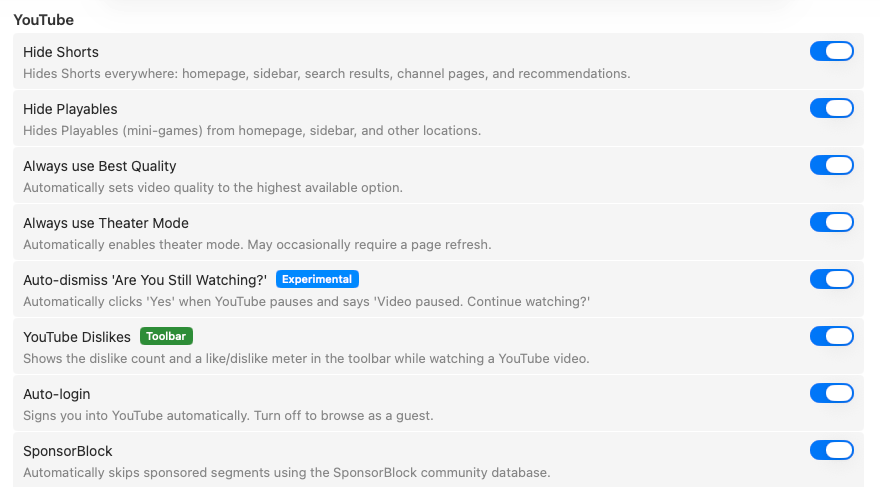
That settings screen holds a few more decide-once toggles worth a look:
- Show YouTube Dislikes — brings back public dislike counts, plus an at-a-glance like-to-dislike rating, so you can judge a video before spending time on it.
- Hide Shorts, Hide Playables, Disable Video Previews — the homepage-shaping toggles, covered properly in the Focus Mode post.
- Auto-login — stay signed into YouTube so your subscriptions and history follow you, or turn it off to browse as a guest.
Playback speed behaves the same way: pick anything from 0.25× to 3.0× in the speed control and your chosen speed is remembered between videos. And skipping the parts inside videos that you didn't come for — sponsor reads, intros, recaps — is its own community-powered feature; see SponsorBlock on Mac for that half of the story.
The common thread is that none of these are exotic preferences. They're the settings a large share of viewers re-apply by hand, video after video, because the page forgets. Spending two minutes in Settings → General → YouTube converts that recurring chore into a decision you made once, in the past, by a version of you who never has to think about it again.
Things to note
- YouTube only. These defaults apply to YouTube; other platforms in Mira keep their own players and their own quality menus.
- "Best" means best available. Mira picks the highest resolution the uploader provided. A video uploaded in 720p plays in 720p — nothing can invent pixels that aren't there.
- 4K costs bandwidth. On a slow connection, always choosing the top resolution can mean more waiting. On iPhone you can set separate quality limits for Wi-Fi and Cellular — or let YouTube choose automatically on Cellular — so a weak signal or a data plan doesn't mean 4K everywhere; on iPad and Mac, lower the setting if your network is struggling.
Mira is a native video player for iPhone, iPad, Mac, and Apple TV that skips sponsors, intros, and other unwanted segments — with searchable transcripts, AI summaries, and synced watch parties.